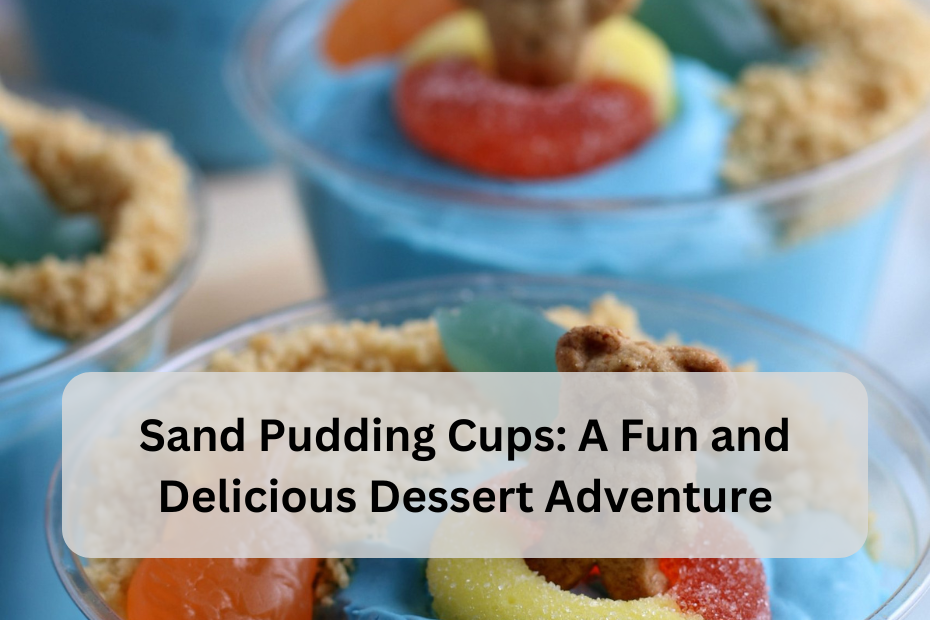
Sand pudding cups are a delightful treat that brings the fun and whimsy of the beach right to your dessert table. These playful desserts mimic the look of sandy beaches with layers of crushed cookies and creamy pudding, topped with gummy worms or other beach-themed candies. Perfect for parties, summer gatherings, or any occasion where you want to add a touch of creativity to your sweets, sand pudding cups are sure to be a hit with both kids and adults alike. In this article, we’ll explore the origins of sand pudding cups, discuss their ingredients, provide a detailed step-by-step preparation guide, share serving suggestions, and answer some frequently asked questions to help you create this delicious and imaginative dessert.
Origins and Inspiration

The concept of sand pudding cups draws inspiration from the playful imagination of creating edible landscapes. By layering crushed cookies to resemble sand and combining them with creamy pudding, this dessert captures the essence of a day at the beach in a delightful and delicious way. Sand pudding cups have become popular at birthday parties, summer picnics, and themed events, where their whimsical appearance adds a touch of fun and creativity to the dessert table.
Ingredients
For the Sand Layer:
- 2 cups vanilla sandwich cookies (like Golden Oreos), crushed
- 1/4 cup unsalted butter, melted
For the Pudding Layer:
- 1 box (5.1 ounces) instant vanilla pudding mix
- 2 cups cold milk
Additional Layers and Garnishes:
- Gummy worms or beach-themed candies
- Whipped cream (optional)
- Extra crushed cookies for decoration
Equipment Needed
- Mixing bowls
- Whisk
- Measuring cups and spoons
- Food processor or plastic bag and rolling pin for crushing cookies
- Clear plastic cups or dessert glasses for serving
Preparation
Step 1: Prepare the Sand Layer
- Crush the Cookies: Place the vanilla sandwich cookies in a food processor and pulse until finely crushed. Alternatively, place the cookies in a large plastic bag and crush them using a rolling pin or the flat side of a meat mallet.
- Mix with Butter: In a bowl, combine the crushed cookies with melted butter until well mixed and the mixture resembles damp sand.
Step 2: Prepare the Pudding Layer
- Make the Pudding: In a large mixing bowl, whisk together the instant vanilla pudding mix and cold milk for 2 minutes, until the pudding starts to thicken.
Step 3: Assemble the Sand Pudding Cups
- Layering: Begin by spooning a layer of the crushed cookie mixture (sand layer) into the bottom of each plastic cup or dessert glass, about 1-2 tablespoons per cup.
- Add Pudding: Spoon a layer of the prepared vanilla pudding over the crushed cookies, filling each cup about halfway.
- Repeat Layers: Continue layering with another spoonful of crushed cookies, followed by more pudding, until the cups are filled to the top.
Step 4: Decorate and Chill
- Garnish: Top each sand pudding cup with additional crushed cookies to create a textured sand effect on top. Place one or two gummy worms or beach-themed candies on top for decoration.
- Chill: Refrigerate the sand pudding cups for at least 1 hour, or until ready to serve. Chilling helps the pudding set and allows the flavors to meld together.
Serving Suggestion

- Party Dessert: Serve sand pudding cups at birthday parties, summer BBQs, or beach-themed celebrations. They make a fun and interactive dessert that guests of all ages will enjoy.
- Summer Treat: Enjoy sand pudding cups on a hot summer day as a refreshing and playful dessert. They are a cool and creamy treat that evokes the spirit of a day at the beach.
- Themed Events: Use sand pudding cups as part of a dessert table at themed events, such as under-the-sea parties or tropical luaus. Customize them with different types of cookies and candies to fit the theme.
FAQ (Frequently Asked Questions)
1. Can I use homemade pudding instead of instant pudding mix?
Yes, you can use homemade pudding if you prefer. Prepare a batch of vanilla pudding from scratch using your favorite recipe and allow it to cool slightly before layering it with the crushed cookies in the cups.
2. Can I make sand pudding cups in advance?
Yes, you can assemble sand pudding cups several hours in advance and refrigerate them until ready to serve. Adding the gummy worms or candies just before serving helps them stay fresh and retain their texture.
3. How can I make sand pudding cups gluten-free?
To make gluten-free sand pudding cups, use gluten-free sandwich cookies for the crushed cookie layer and ensure that all other ingredients, including the pudding mix, are certified gluten-free.
4. Can I substitute the vanilla pudding with chocolate or another flavor?
Absolutely! Experiment with different flavors of pudding mix, such as chocolate, butterscotch, or even banana, to create unique variations of sand pudding cups. Match the cookie and candy toppings to complement the pudding flavor.
5. How should I store leftover sand pudding cups?
Store any leftover sand pudding cups in the refrigerator, covered with plastic wrap or in an airtight container, for up to 2 days. The cookies may soften slightly over time, but the flavors will still be delicious.
Conclusion
Sand pudding cups are a whimsical and delicious dessert that brings the joy of the beach to your table. With layers of crushed cookies and creamy pudding, topped with fun gummy worms or beach-themed candies, they are sure to delight both children and adults alike. Whether served at a party, summer picnic, or themed event, sand pudding cups are a creative way to enjoy a sweet treat with a playful twist. By following the simple steps outlined in this article, you can easily create these fun and flavorful desserts at home.
Final Thoughts
Creating sand pudding cups allows you to indulge in a delightful dessert that combines creativity with delicious flavors. Whether you’re hosting a party or simply looking for a fun dessert idea, sand pudding cups are a versatile option that can be customized to suit any occasion. Gather your ingredients, assemble your cups, and enjoy the smiles as everyone digs into these whimsical treats that capture the essence of a sunny day at the beach.
Read Also: Café Rio Dressing: A Flavorful Addition to Your Meals